
Guide
How to make UGC videos for brands
Brands do not want polished studio ads. They want videos that look like they were filmed by a real person who actually tried the product - because those convert better. This guide covers the entire production process from reading your first brief to uploading a finished file that gets approved.
On this page
Quick answer
Who this guide is for and what you will learn
This guide is for creators who have been accepted to a UGC campaign - or are preparing their first portfolio videos - and want to know exactly how to produce content that brands approve on the first submission. It assumes you have a smartphone, a room with at least one window, and a free editing app like CapCut installed.
After reading this guide you will know the difference between UGC videos, regular Instagram posts, and paid ads, what equipment actually matters versus what is optional, how to write a short UGC script that follows a structure brands recognize and respond to, the exact shots you need to film, how to edit for brand use, and the submission checklist that prevents avoidable rejection.
UGC video vs. Instagram post vs. paid ad
A UGC video is a brand asset that a company will use in its own marketing channels. The brand may place it as a Facebook or Instagram ad, embed it on a product page, use it in an email campaign, or post it on their own social accounts. Your job is to produce a usable raw asset, not to grow your own audience. This is why the quality standard for UGC is 'authentic and clear' rather than 'cinematic and viral.'
| Format | Who produces it | Primary purpose | Optimized for | Follower requirement |
|---|---|---|---|---|
| UGC video | Independent creator | Brand asset for ads, product pages, and social | Authenticity and conversion | None |
| Instagram post or Reel | Creator or influencer | Organic reach and audience engagement | Entertainment and virality | Yes - audience is the product |
| Paid ad | Agency or production house | Direct sales and retargeting | Precise messaging and CTA | None - distributed via ad spend |
What you need before filming
The gear requirements for UGC videos are genuinely minimal. Brands have been selecting and approving phone-filmed content for years, and the premium they put on authenticity means that over-produced content sometimes performs worse in ads than simple, natural-looking footage.
- Smartphone with a rear camera - iPhone or flagship Android from 2020 or later. Shoot with the rear camera, not the selfie camera, for noticeably better quality.
- Natural light source - A window with indirect daylight is ideal. Face the window so the light falls on your face. Avoid filming with a window behind you.
- Clean, simple background - A plain wall, a tidy shelf, or a relevant surface (kitchen counter for food, bathroom counter for skincare). Avoid busy or cluttered backgrounds.
- Phone tripod or stable surface - A Rs. 400 phone tripod from any electronics shop prevents shaky footage. A stack of books works in an emergency.
- Quiet room - Background noise is one of the most common reasons brands request retakes. Close windows and doors and film when the space is quiet.
- CapCut or similar editing app - CapCut is free, available on Android and iOS, and has every feature a UGC creator needs: trimming, captions, background music at low volume, and export at high quality.
- The product itself - You need to physically have the product unless the brand is sending it to you. Confirm this before accepting any campaign.
Step 1: Read the brief (twice)
The brief is the most important document in the entire UGC production process, and most beginners read it once too quickly. Every revision request and rejection that could have been avoided traces back to something the creator missed or misread in the brief.
When you open a brand brief, read through the full document once to understand the overall goal. Then read it again and take notes on four things: the required format (vertical 9:16 or horizontal, length in seconds, whether captions are required), the tone (conversational, enthusiastic, clinical, neutral), the key message or claim the brand wants communicated, and any restrictions or prohibited content.
Common restrictions that trip up beginners include: not mentioning competitor brands, not making specific health or results claims (especially for supplements and skincare), not using certain types of music, and not modifying the brand name or product name. If you see any restriction you are unsure about, message the brand through the platform before filming. That one message saves you a reshoot.
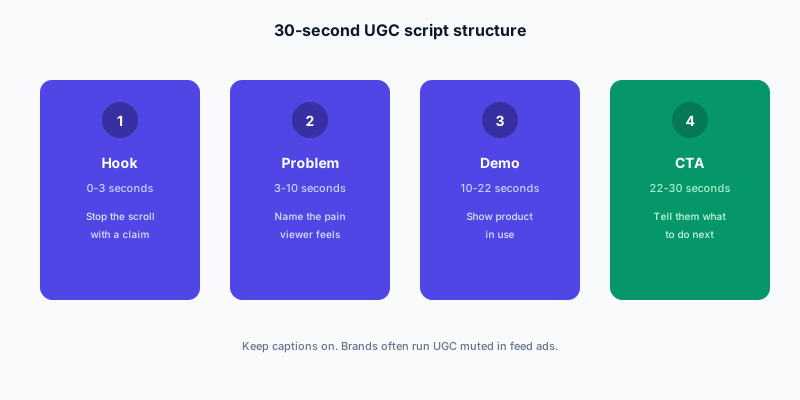
Step 2: Write a 30-second script using PAS
Notice what this script does not do: it does not exaggerate with claims like 'cleared my skin completely in three days' and it does not sound like an advertisement. It sounds like something a real person would say to a friend. That is the register brands are paying for.
- Hook (seconds 0-3): 'I used to wake up and immediately notice how dull my skin looked, especially in the morning light.'
- Problem (seconds 3-8): 'I tried three different moisturizers and a toner routine but nothing actually changed the texture or brightness.'
- Agitation (seconds 8-15): 'The worst part was spending money on products that did nothing. My skin just looked tired all the time.'
- Solution (seconds 15-25): 'Then I started using [Brand Name] Vitamin C Serum every morning before sunscreen. Within two weeks the dullness was genuinely gone and a few dark spots had faded.'
- CTA (seconds 25-30): 'It is the one product I actually repurchase. Link is in the description if you want to try it.'
Step 3: Set up your phone for filming
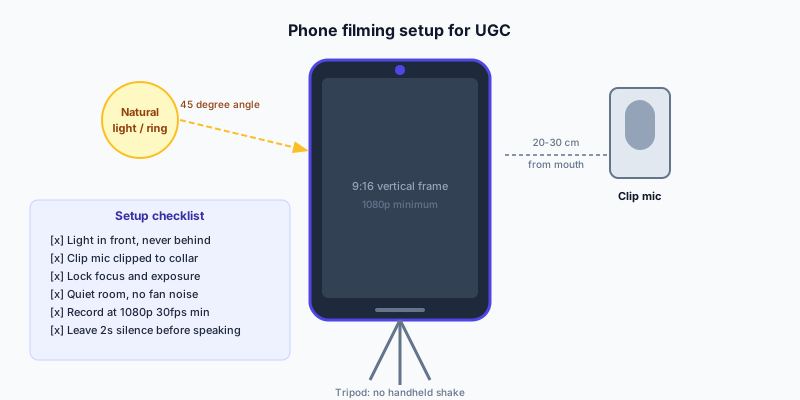
Spend five minutes on setup before you record a single second. Good setup makes the editing process dramatically easier and is the single biggest factor in whether a brand requests a retake.
- Film vertical (9:16) by default - most UGC briefs request portrait orientation for Reels and TikTok-style ad formats. Confirm the aspect ratio in the brief before filming.
- Set your phone camera to 4K 30fps if available, or 1080p 60fps. Higher resolution gives the brand flexibility to crop or zoom without quality loss.
- Turn off the flash - it creates harsh, unnatural lighting that immediately reads as amateur.
- Enable gridlines on your camera app to keep horizon and framing straight.
- Position the camera at eye level or very slightly above - never from below. Below-eye-level angles are unflattering and read poorly in ads.
- Frame yourself with about one to two finger-widths of space above your head. Do not leave excessive headroom.
- Tape a small piece of paper with your three to four talking points just below the camera lens so your eyes stay near the lens while you speak.
- Do a five-second test clip and play it back with headphones to check audio before your real takes.
Step 4: Film your talking head and b-roll
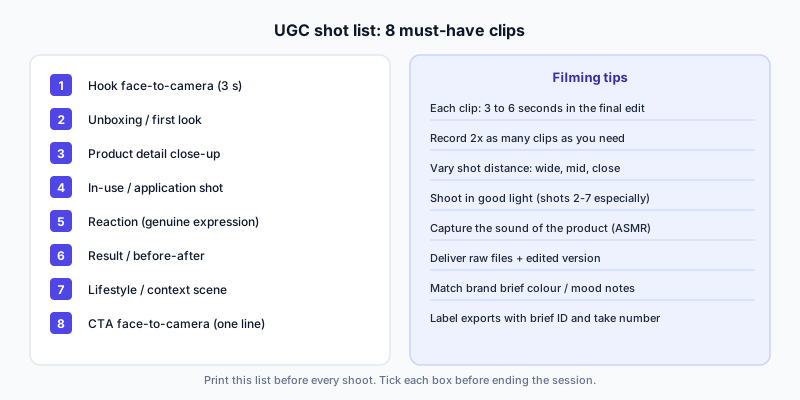
Film each shot at least twice. Delete nothing from your phone until the brand has approved the final submission. Brands occasionally request additional footage, and you do not want to reshoot an entire session because you deleted the b-roll takes.
- Talking head take 1: Full run-through of your script, following the PAS structure. This is your 'safety' take.
- Talking head take 2: Second run-through with more energy - slightly louder, slightly faster, more direct eye contact with the lens. Brands often prefer a more energetic version.
- Product close-up: Hold the product clearly in frame for three to five seconds. Show the front label, then the back label. Keep it still.
- Product in use - hands only: Apply the product, open the package, or demonstrate the relevant action. Film your hands from slightly above.
- Texture or detail shot: Get close enough that the product's texture, color, or finish is clearly visible. Useful for skincare, food, and beauty products.
- Lifestyle clip: Film a short clip of you doing something natural that relates to the product - sitting at a vanity, cooking, working out. This gives the brand contextual footage.
- Reaction shot: A genuine reaction after using the product - smiling, nodding, looking pleased. Keep it authentic, not theatrical.
Step 5: Edit for brand use in CapCut
Brand editing standards for UGC are different from editing standards for your personal content. The goal is clean, watchable, and professional - not cinematic or highly stylized. Keep effects minimal unless the brief specifically asks for them.
Open CapCut, import your talking head footage, and trim three things: any silence or stumbling at the very start before you begin speaking, any pauses longer than half a second in the middle of your script, and anything after your final word. Clean audio transitions matter more than visual polish for UGC.
Cut in your b-roll clips over the talking head audio. Place product close-ups over the section where you mention the product name. Place the lifestyle clip over the solution section. Keep each b-roll cut between two and four seconds - longer clips slow the pacing.
Add captions using CapCut's auto-caption feature. Brands use your video in ad formats where many viewers watch with sound off. Captions are not optional for most modern UGC campaigns - check your brief. If captions are required, export with them burned in unless the brief asks for a clean version plus a separate SRT file.
Keep background music at 10 to 15 percent volume if the brief permits music. The speaking should always be clearly audible over any music. Do not use trending sounds from Reels - brands cannot use copyrighted audio in paid ads without a license.
Export at the highest quality setting. For most phones this is 1080p or 4K. File size will be 50MB to 300MB depending on length and resolution - this is normal.
Step 6: Submit on UGC Content
Log in to your UGC Content creator dashboard and open the active campaign. Upload your video file through the submission interface. Before you click submit, run through the brief one final time and confirm: the video is the correct length (within five seconds of the brief requirement), the aspect ratio matches, the brand name is pronounced and spelled correctly, captions are visible if required, and the file quality looks clean on your phone screen.
Add a short submission note - two or three sentences - describing what you filmed and noting anything relevant the brand should know. Something like: 'Filmed as a PAS talking head with four b-roll clips. Captions are burned in. Used indirect window light from the right side.' This shows professionalism and tells the reviewer what to expect.
After submission, the brand typically reviews within three to five business days. You will be notified if they approve or request changes. If they request a change, address it specifically and resubmit promptly. Most approval issues on first submissions are small - a clip length adjustment, a caption correction, or a request for one additional b-roll shot.
10 beginner mistakes to avoid
- Filming with the selfie camera instead of the rear camera - image quality is significantly lower.
- Having a window or bright light source behind you - this creates silhouette footage that is unusable.
- Starting the video with silence or movement before speaking - always trim your in-point to your first word.
- Memorizing and reciting a script rather than talking naturally from bullet points - scripted delivery sounds stiff and brands can tell.
- Filming in a room with audible background noise - AC, traffic, family conversations, and fans all degrade audio quality.
- Exaggerating results or making specific quantified claims the brand did not authorize - this leads to rejection and can affect your creator rating.
- Submitting without watching the full exported video once - export artifacts, audio sync issues, and caption errors are only visible in the exported file.
- Using trending audio from Instagram or TikTok - copyrighted audio cannot be used in paid ads and will require a reshoot.
- Skipping b-roll and submitting a single uncut talking head - most brands need variety cuts to build a 15 to 30-second ad.
- Not confirming product delivery before accepting a campaign - if the product never arrives and the deadline passes, you get a late mark on your profile.
Worked example: filming a 45-second skincare UGC video
Anjali received a campaign brief from a D2C skincare brand for a 40 to 50-second talking-head video promoting a niacinamide serum. The brief required vertical 9:16 format, captions, no claims about treating medical conditions, and a specific CTA directing viewers to the brand's website.
Anjali read the brief twice, underlined the CTA wording the brand provided, and wrote a PAS script in a notes app. She filmed in her bedroom at 4pm when the window light was at its best, placing her phone on a tripod at eye level with the window to her left.
She filmed two full talking-head takes, then filmed product close-ups (front label, back label, serum dropper), a hands-only application clip, and a lifestyle shot of her at her vanity. Total filming time was 22 minutes.
She edited in CapCut: trimmed both talking-head takes, chose the second (more energetic) version, cut in the product close-ups over the middle section, added burned-in captions via auto-caption, and set background music at 12 percent volume. Export took three minutes.
She watched the full export once, caught a caption typo in the brand name, corrected it, and re-exported. She submitted with a three-line note and the brand approved without revisions four days later.
How UGC Content makes this process easier
UGC Content structures every campaign with a standardized brief format so you always know exactly what format, length, tone, and usage rights are expected before you accept. The platform brief template reduces the back-and-forth that happens with direct brand deals where requirements are communicated by email over several days.
The revision workflow is built into the platform: brands leave specific timestamped feedback on your submitted video rather than vague email notes, so you know exactly what to change and where. Payment is held in escrow from the moment the campaign goes live, so you are never in the position of chasing a brand for payment after delivery.
Your accepted and approved videos are automatically added to your UGC Content portfolio, which brands can view when reviewing your application for future campaigns. A strong approval history on the platform directly affects which campaigns you get access to and at what rate.
FAQ
How do you make UGC videos for brands?
Read the brief, script a hook in the first 2 seconds, film on your phone with clear audio and natural light, edit to the required length, upload on the platform or deliver per the brand's process, and handle one revision round if requested.
What is the best phone to make UGC videos?
Any iPhone or flagship Android from 2020 or later is more than adequate. iPhone 12 and above, Samsung Galaxy S21 and above, and Pixel 5 and above all produce video quality that brands routinely approve. Do not buy a new phone for UGC - focus on lighting and audio first.
How long should a UGC video be?
Check the brief first - it will specify. The most common formats are 15 seconds (hook-only), 30 seconds (PAS talking head), and 45 to 60 seconds (longer tutorial or unboxing). Brands rarely ask for anything longer than 90 seconds. Keep within five seconds of the brief requirement.
Do UGC videos need captions?
Most briefs for social media and ad formats require captions because 60 to 80 percent of social video is watched with sound off. Check the brief. If it is required, burn captions into the exported file unless the brief specifically asks for a separate SRT file or a clean version.
Can you do UGC videos without showing your face?
Yes. Brands also use hands-only product demos, voiceover-only tutorials, and b-roll lifestyle packs. These are legitimate UGC formats. However, talking-head testimonials are the most common and typically the highest-paying format, so building comfort on camera opens more campaign options.
What editing app should you use for UGC videos?
CapCut is the most widely used app among Indian UGC creators and has all the features needed: trimming, captions, b-roll insertion, background music, and high-quality export. It is free. VN Video Editor and InShot are good alternatives. Adobe Premiere Rush is an option if you want desktop-quality editing on your phone.
How do you write a UGC script?
Use the PAS structure: hook (what problem are you addressing), problem (describe the pain point authentically), agitation (why this problem is frustrating), solution (how this product solved it), CTA (what the viewer should do next). Write bullet points, not a word-for-word script. Speak from the points naturally.
What if the product does not actually work for you?
Do not claim results you did not experience. If the product genuinely did not work for you, it is better to decline the campaign or message the brand about this before filming. Fabricated testimonials create problems for brands and can damage your creator reputation if a brand discovers the review is inaccurate.
How many takes do you need to film?
Film at least two full talking-head takes and at least two takes of each b-roll shot. Three takes per shot is ideal. Keep all footage until the brand approves the final submission. Deleting footage before approval has caused many creators to reshoot entire sessions over a small change request.